Introduction
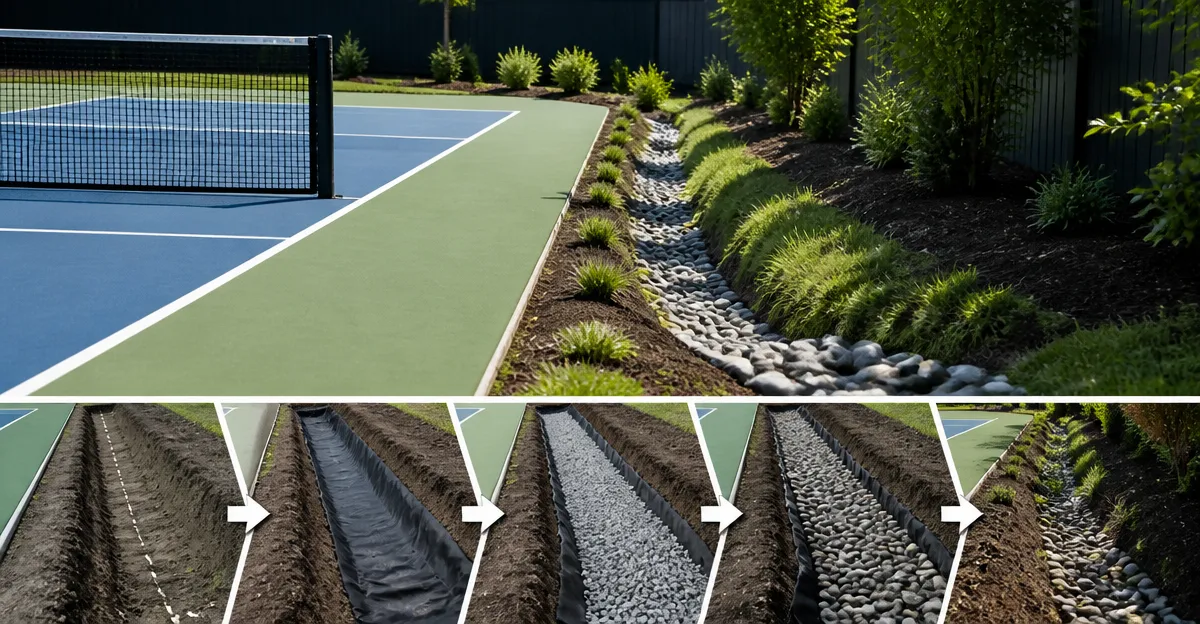
One of the most common challenges faced by homeowners who install a backyard pickleball court is managing surface water. Heavy rain can create puddles, erode the playing surface, and reduce the longevity of the court. By constructing a low‑profile drainage swale, one can direct runoff away from the court, protect the surrounding landscape, and maintain optimal playing conditions. This guide explains the planning, excavation, and finishing steps required to build a functional swale, and it highlights a cost‑effective product that simplifies the process.
What You’ll Need
- Shovel, spade, or mini‑excavator for soil removal
- String line and wooden stakes to mark the swale alignment
- Measuring tape, carpenter’s level, and a line level for grading
- Compactable base material such as crushed stone or gravel (½‑inch to 1‑inch size)
- Heavy‑Duty Weed Barrier Fabric (3 ft × 50 ft) – $11.52, 4.4 / 5 stars (4,097 reviews)
- Garden rake, wheelbarrow, and hand tamper
- Landscape edging or timber for side support (optional)
Step 1: Assess Site and Determine Swale Location
Begin by observing how water moves across the yard during a rainstorm. One should look for low‑lying areas where water pools and note the natural slope of the terrain. Using a level, measure the existing gradient; a 1‑2% slope (approximately 1‑2 feet of drop per 100 feet of length) is sufficient for a low‑profile swale. Mark the proposed swale path with string and stakes, ensuring it runs downhill away from the court and toward a drainage outlet such as a dry well, French drain, or street curb.
Step 2: Design the Swale Profile
The swale should be shallow yet wide enough to convey runoff. A typical cross‑section is 6‑12 inches deep and 2‑3 feet wide at the surface, tapering toward the bottom. Sketch the profile on paper, indicating the top width, bottom width, and depth. This design helps calculate the volume of soil to be removed and the amount of base material needed. Remember that the swale’s slope must be consistent; irregular grades can cause water to pond instead of flow.
Step 3: Excavate the Swale Trench
Using a shovel or mini‑excavator, remove soil along the marked line to the designed depth. One should keep the bottom of the trench as level as possible while maintaining the overall slope. Place the excavated soil to one side for later use in backfilling or landscaping. After the bulk of the soil is removed, use a garden rake to smooth the sides and bottom, eliminating high spots that could impede flow.
Step 4: Install a Compactable Base Layer
Spread a 2‑inch layer of crushed stone or gravel over the bottom of the trench. This layer serves two purposes: it provides a stable foundation that prevents the swale walls from collapsing, and it enhances drainage by allowing water to percolate through the stone. Use a tamper or plate compactor to firmly compact the base, creating a uniform surface. A well‑compacted base reduces future settlement and maintains the intended slope.
Step 5: Lay the Heavy‑Duty Weed Barrier Fabric
Now it is time to install the Heavy‑Duty Weed Barrier Fabric. This woven geotextile is made from polypropylene, offering high tensile strength and excellent tear resistance. Its permeability allows water and nutrients to pass through while blocking weed growth, which is essential for a low‑maintenance swale. Unroll the fabric along the length of the trench, overlapping adjacent sheets by at least 12 inches to ensure continuity. Cut the fabric to fit the swale’s shape using a utility knife. Secure the edges with landscape staples or pins, especially at the outlet where water exits the swale.
Why this product is useful: the fabric’s durability (3.2 oz weight) withstands foot traffic and occasional vehicle passage, and its water‑permeable nature prevents the swale from becoming a stagnant basin. At a price of $11.52 for a 3 ft × 50 ft roll, it provides a cost‑effective solution compared with premium commercial geotextiles, while the 4.4‑star rating confirms user satisfaction.
Step 6: Add Gravel or Soil Cover
After the fabric is secured, cover it with another 2‑inch layer of washed gravel. This top layer protects the fabric from abrasion, distributes the load from foot traffic, and further improves drainage. If the swale will be partially visible, one may use a fine‑grade topsoil mixed with sand and then seed with a low‑maintenance groundcover such as clover. The groundcover will stabilize the surface and reduce erosion, while the underlying fabric continues to inhibit weeds.
Step 7: Finish the Swale and Test Water Flow
Level the final surface with a rake, ensuring the swale maintains its designed slope. Install landscape edging or timber along the sides if additional support is desired, especially on steeper banks. Once the swale is completed, simulate rain by using a garden hose to run water from the highest point to the outlet. Observe the flow; it should move steadily without pooling. Adjust the slope or add more gravel if any slow‑moving sections are identified.
Tips & Pro Tips
- Perform the excavation when the soil is moist but not saturated; this makes digging easier and reduces the risk of creating overly compacted sections.
- Use a string line with a line level to double‑check the slope every 10 feet during excavation.
- When cutting the fabric, leave a small margin of excess at the outlet to allow for future adjustments or repairs.
- Consider adding a perforated pipe (French drain) at the bottom of the swale for high‑volume runoff areas.
- Periodically inspect the swale after heavy rains for any signs of erosion or blockage, and clear debris promptly.
Troubleshooting
Problem: Water pools at the swale entrance.
Solution: Verify the slope using a level; re‑grade the entrance by adding or removing soil to achieve a consistent downhill grade.
Problem: Weed shoots appear through the fabric.
Solution: Ensure the fabric overlaps are sufficient and that staples are firmly driven. Replace any torn sections with new fabric.
Problem: Swale settles over time, reducing depth.
Solution: Add additional gravel and compact it. If settlement is severe, re‑install the fabric in the affected area.
Conclusion
By following this step‑by‑step guide, one can construct a low‑profile drainage swale that effectively redirects runoff away from a backyard pickleball court. The swale protects the playing surface, reduces maintenance, and extends the lifespan of the court. Incorporating the Heavy‑Duty Weed Barrier Fabric ensures long‑term weed control and durability while remaining budget‑friendly. One should now feel confident to implement the design, test the system, and enjoy a dry, high‑performance court year after year.
Products Mentioned in This Guide
Frequently Asked Questions
Why is a low‑profile drainage swale important for a backyard pickleball court?
It channels rainwater away, preventing puddles, erosion, and surface damage that can shorten the court’s lifespan.
What materials are recommended for building the swale base?
Use compactable crushed stone or gravel (½‑inch to 1‑inch size) topped with a heavy‑duty weed‑barrier fabric.
How do I determine the proper slope for the swale?
Aim for a 1‑2% grade (1‑2 ft drop per 100 ft) measured with a carpenter’s level or line level to ensure water flows away from the court.
Can I install the swale with hand tools or do I need a mini‑excavator?
Both work; a shovel or spade is fine for small projects, while a mini‑excavator speeds up soil removal on larger courts.
What is the role of landscape edging in a drainage swale?
Edging or timber holds the swale shape, prevents side erosion, and keeps the base material in place.